Stop Drinking Water

Stop Drinking Water

tips for staying hydratedWe are in a bit of a hot streak so many people are trying to figure out how to drink enough water. There are various methods including: put lines on a bottle to mark how much water you should be drinking every hour; fill mason jars every morning and drink them throughout the day, carry a water bottle on your hip everywhere you go, add slices of lemon to it to make it taste yummier, and I’m sure there are plenty more ideas. I’m going to add mine to the mix: stop drinking water!

Here are some quick facts: New studies have shown that there is no specific amount of water that every individual must drink every day. Rather, our daily water requirements vary depending on out health, weight, activity level, and where we live. Signs of a good amount of water intake include not feeling thirsty through the day, adequate amounts of saliva, and light yellow or clear pee.

So now that we know how to make sure we are hydrated enough, let’s stop counting how many glasses of water we drink per day. It was about 30 deg C here today (that’s about 86 F for my American readers). Pretty hot for this part of the world. Tomorrow is supposed to be even hotter. I’m also breastfeeding which means I should technically drink an extra 2-3 cups of water per day.

I had a total of one cup of water.

Eeek! I must be dehydrated, right? Um, no. I also had a cup of coffee, a few cups of milk, a popsicle (okay, maybe I had two!), steamed veggies, and some iced tea. My mouth is watering (possibly because I’m thinking about popsicles), my pee is light yellow (just what you wanted to know about me, right?) and I’m not thirsty. Adam pretty much never drinks water but he is the most hydrated person that I know. He drinks iced tea. Unhealthy amounts of sugar-filled iced tea. (I’ve been trying to convince him to try homemade iced tea but his iced tea is an area he is not willing to compromise).

So stop drinking water. Or at least don’t drink 8 glasses per day of it. Here are some options to try instead:

  • Milk (my personal favorite)
  • Fruit or veggie juice
  • Iced Tea
  • Coffee
  • Tea
  • Fruit (or veggie) smoothies or milk shakes (yummy simple recipe: frozen strawberries, and Costco’s forzen fruit medley clended with cold milk or grape juice. Add a banana for sweetness)
  •  Fruit and water-filled veggies (watermelon, lettuce, grapes etc)
  • Popsicles (fill a mold with OJ for a refreshing treat)
  • Yogurt

What is your favorite non-water way to stay hydrated?

Java

There is something satisfying about drinking my morning coffee from a pretty cup. It’s even better when I can drink it hot. Hot coffee seems like such a novelty to me.
I am not one of those people that needs to drink my coffee before I get my day started. My day starts the instant my little ones and I awake. They hit the ground running and I find it is best if I follow suit. I use it more as a reward for when I’m done my first couple tasks in the morning. I clean for a couple hours (with frequent interruptions to referee or wipe bums) and then I get to sit down with my coffee and sometimes a good book, sometimes Facebook or Pinterest, or sometimes a stack of Magic School Bus books with two children in my lap.
I’m used to drinking lukewarm coffee. I have even been known to stick it in the microwave to reheat (yes, I do realize microwaves are not optimal for health so if you have another quick way to warm it up I’m all ears). I used to put it in a spill proof thermos cup so I could have hot coffee all day long and not have to worry about the kids knocking it over. Then I realized that I just really look forward to my 5 minute intervals of sitting on the couch, sipping my coffee, pretending that I am in a quaint Parisian coffee house listening to Bach and reading a really great historical romance novel.
My daily “me time” consists of a pretty mug, lukewarm coffee that is heavily laden with French vanilla creamer and the tumult of two little boys, that I absolutely adore, playing with their trucks and loaders. Peace and quiet will come one day and, on that day, I’ll be glad I appreciated the noise while it lasted.
Home Management is Not Learned in a Day

Home Management is Not Learned in a Day

I am scatterbrained. I am one if those people that will run out to the car and back to the house 3 times because I forget things like keys, diaper bag, and once even the baby. True story! Don’t worry, I realized I didn’t have him before I actually reached the car and, in all fairness, he was only a couple months old so I was still new to the mothering thing.
I can also be a perfectionist. This is a very bad combination. I am not one of those people that is a natural born housekeeper. Though I crave organization, I find it very difficult to achieve.
I used to be organized. When I was a child, I made my bed every morning and placed all my stuffed animals in their proper spots on my bed. When it was bedtime, I placed those same stuffed animals on the floor surrounding my bed to they could “guard” as I slept (I have no idea why I thought I needed their protection through the night). I was up at 6am so I could do my homework in peace, tidy my room, and have a really great (and long) shower. Life was great when all I had to do was organize my stuffies.
My whole adult life has been much more chaotic. It didn’t help that when I moved out of my parents’ house and became a home manager and wife all in the same breath. I had done my chores growing up but I really had no idea how to run a household.
Insert several years of floundering with household management (everything except the financial end anyway, I have always been good with budgeting).
Insert baby #1 and becoming a SAHM. Soon my son began to crawl and keeping my floors clean became my number one priority. Then he began to eat solids and cooking became a necessity. I started scraping by. Eventually I became pregnant again and realized that as excited as I was about it, I had no idea how I was going to add another child into my wonderful life and crazy household.
I read somewhere that if you have less stuff then you have less stuff to take care of.  So we dejunked. It was a little bit easier (I didn’t have to show people a “junk room” when I gave them the grand tour) but housekeeping was still tough. Correction, it is still tough. I used to feel embarassed about my home and did the “mad woman cleaning blitz” anytime a friend came over. I also tried to avoid inviting people over to my house as often as possible and would go to their house to visit instead (some of my friends are nodding their heads while they read this, realizing they have never, or rarely, seen my home). About a year ago, I realized this was silly.
My mom told me this (true) story one time: Mom had three little kids (a total of less than 3.5 years between the oldest and youngest) and had just moved. There was something about kitchen renovations going on as well. Her friend called her and let my mom know that she was on her way to visit. As much as mom looked forward to seeing this friend, she looked around her kitchen with horror. This friend was a little bit of a neat freak. To the point that she was bordering on OCD. Mom panicked. She hadn’t fully moved in yet so several cupboards were still empty. So all the dirty pots, pans, and dishes got stuffed in the cupboards and she closed the doors. A quick wipe of the counter and the kitchen looked spotless. Mom was feeling pretty good about the whole thing.
In walks her friend.
Keep in mind that this was a new (to us) home. This friend is OCD about dirt and dust. This friend is also kind of a snooper. So she started opening the kitchen cupboards. One by one she opened, looked inside, and shut the door. Mom held her breath and tried to think of a way to distract her friend. Her friend opened the cupboards with the dirty dishes, looked, didn’t say a word, and closed them again.
Moral of the story: If this particular friend of my mom (and believe me when I say her own house is immaculate and pretty much always has been) didn’t say anything about the dirty dishes in the cupboard, chances are none of your friends are going to say anything about the dust on your TV or the sand on your floors of the dishes in your sink. Because trust me when I say we all have it. Even my most organized friends have dirt on their floors.

The bad news: My home is not perfect and never will be. The good news: I’m getting better. I am slowly building a system that works for me. A system that helps me track what I need to do on a regular basis but gives me enough flexibility for when life hiccups and my schedule is no longer my own. I can’t begin to describe the freedom that I have knowing that I don’t have to clean the bathroom today because it is on the docket for Monday. And isn’t that what having a clean home is really about, freedom? Mental, physical and even spiritual freedom?

So tell me, are you naturally organized or do your flounder and scrape by? Or better yet, have you found a system that works for you and your family?
Tomatoes – Attempt #2

Tomatoes – Attempt #2

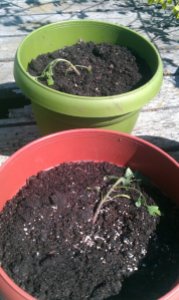
I didn’t post about my first attempt because it didn’t last long enough to be significant. I bought 6 tomato starters, transplanted them, and then thought that 15 degrees at 11:00pm meant that it would not freeze that night. I was wrong.

Poor Tomatoes

I did things a little bit differently the second time around and I’m hoping and praying for better results. I actually said a prayer over my tomatoes.

Since I killed my first 6 tomato plants in less than 24 hours of purchasing them, I have learned a lot about tomatoes. Some sites I read say that they are easy to grow. Most say they are not. They can either be “hugely satisfying or a flat out disaster.” Here are some of the tips that I learned:

I also got a couple of (free) ebooks off Amazon. I don’t have a Kindle but I put the Kindle app on my phone and computer. I have two ebooks specifically about container tomatoes and several more about gardening and container gardening in general.  With all the reading I have done, I’m hoping for a bumper crop of tomatoes in the fall.

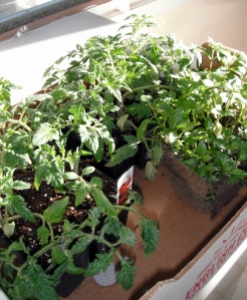
Tomato Babies

Uh oh!

So yesterday I transplanted my tomatoes, with eggshells at the bottom of the hole, and put them in a sunny spot on my deck. I made sure to bury them up to the top leaves and watered them well. I was feeling pretty good about myself and held high hopes for the future of my baby tomatoes. Until the wind started. We had just over an hour of extremely fierce wind mixed with a touch of rain. So I dragged all of my containers in the house. Just as I put the last one inside and shut the front door, my tomato babies were viciously attacked by a baby bear! My littlest munchkin thought it was great fun to have dirt in the house and decided that containers with soil are just as much fun as the sandbox. Then he got upset when I reprimanded him and took it out on my plants. Half a leaf was torn off. That plant had an extra prayer said over it. Worst case scenario, it dies. I have a few back ups just in case.

Today is looking sunny already, albeit a little bit windy. My littlest allowed me to sneak away this morning and slept just long enough for me to move my containers back outside and water them well. He will realize they are out of his reach and my little spitfire will certainly let me know his feelings on the matter but, for now, both the tomatoes and my little guy are content. Now to see if I can keep them alive. The tomatoes I mean. I’m pretty good at keeping my kids alive for longer than a day! Please tell me that I’m not the only one who has had such terrible luck with tomatoes. And if you have good luck, what’s your trick?

The irony of it all: I don’t even like tomatoes. I only want them to make homemade spaghetti sauce.

How To Make Yogurt

How To Make Yogurt

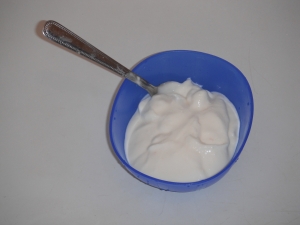
Bowl of homemade yogurt
I have been making yogurt (on and off) since September 2011. I have read a whole bunch of recipes and, through much trial and error, found a recipe that works for my family. Some things that I have learned about how to make yogurt are as follows:

1. The longer you let the yogurt ferment, the more tart it becomes. My family does not like tart yogurt so about 4-5 hours results in a milder taste.
2. If the milk boils over you can clean up the mess while it cools down and the remaining milk will still work for yogurt.
3. A thermometer is handy to have but not essential.
4. White/clear vanilla tastes much better than the dark stuff.
I will tell you my method but you may need to tweak it a bit for your family’s taste preference.
Materials required:
  • Container(s) for finished yogurt with a secure lid (glass or plastic works)
  • Enough milk to fill your container(s)
  • Pot with a lid that will fit the milk
  • Thermometer (handy but optional)
  • Yogurt starter or some store-bought yogurt with live, active bacterial cultures (doesn’t really matter which brand, I have had success with several kinds, it is handy if it is plain or vanilla because otherwise you end up with a couple chunks of fruit in your yogurt)
  • For greek yogurt: fabric to strain through (I have used cotton flat diapers and flannel receiving blankets), colander, and a pot that fits the colander if you want to save the whey
Steps:
  1. Put milk into pot.
  2. Heat the milk until almost boiling (about 180F). It will reach this temperature much faster if you use a lid.
  3. Simmer at this temperature for about 1-2 hours (with a lid so it doesn’t lose heat)
  4. Remove from heat. At this point you can put it into a sink full of cold water to speed cooling or just let it sit on your counter to cool. It is ready when it is about the same temp as a warm (not hot) bath (about 110F). If it is too hot your starter bacteria will die. (I tried to think of another way to word that but “get killed” sounded just as drastic)
  5. Have about a tablespoon of starter yogurt per liter of milk. Put them in a separate small bowl and add a few tablespoons of milk. Mix well. It is easier to mix into a large milk amount when it is diluted a bit with the milk already.
  6. Pour milk-diluted starter into your milk and mix well. At this point you can also add some vanilla or other extract. (Some recipes say you can add sugar/sweetener at this point but I have never had luck with that.)
  7. Pour into your yogurt container(s).
  8. Wrap in a blanket and/or put in a warm place where it will not get disturbed while it ferments. I usually turn my oven on for a bit (until it reaches about 100F) and then turn it off, wrap my yogurt in a blanket and put it in the oven. I have also put it in the bathtub wrapped in a blanket but that piqued my sons’ curiosity a little too much. In the oven it is out of their sight.
  9. Let it sit, undisturbed, for about 4-5 hours.
  10. Put it in the fridge overnight and by morning you will have yogurt!
Greek yogurt:
  1. The next morning pour/dump your yogurt into the colander lined with the fabric
  2. Put it in the fridge and let the whey drip out. I usually leave it for about 3 hours for 7 cups of yogurt.
  3. Put it back in the container (or in a different one if you prefer).
    Note: For 7 cups of yogurt I end up with about 2 -3 cups of Greek yogurt. And you can use the whey for numerous things, though I still haven’t figured out what to use mine for.
So there you have it. Here is the short version: Heat milk, cool milk, add starter, let it sit in warmth, overnight it in the fridge and enjoy!
I usually start my yogurt at about 2pm (while my littlest is napping) and heat till around 4. Then it ferments until about 9 and I stick it in the fridge overnight. I set my oven timer and have even put reminders on my phone because otherwise I forget about it.
Have you ever made yogurt? I’d love to hear your yogurt making stories!
Do you have any other tips/tricks to share?

Pin It on Pinterest