by Tessa | Homemaking

I would venture to say that the majority of people who know me know about my love-affair wtih vanilla. Whether it is in food, or body care products, or candles, I just can’t help myself. It is delicious and beautiful all at the same time! I used to wear vanilla perfume every day and apparently it was seen as “my” scent. Other people would wear it and people who knew me would tell them they smelled like me. My sister’s friend even found a bottle of vanilla perfume while they were in the drugstore and told me sister, “it’s Tessa in a bottle!” So it would make sense that, after seeing all the wonderful vanilla recipes floating around on Pinterest, that I felt compelled to try one.
So today my biggest boy and I made some vanilla extract.

Helping Hands
The ingredients were very simple:
- Vanilla beans (I purchased mind from Real Raw Food in BC, Alberta). I have had the beans for a few months and have been waiting for jsut the right recipe to use them in. They are very precious to me so I didn’t want to waste any.
- Vodka (recipes called for 35%-40% alcohol, I got 40%). I had the pleasure of supporting a local business for this purchase. Chateau Wine and Spirits in Lacombe, Alberta, is a fabulous place to deal with. They offer everything from cheap to specialty beers and wines and vodka and every other kind of alcoholic beverage that tickels your fancy. As I never (read: only once in my entire life other than this time) purchase alcohol, the customer service was great to a newbie like myself. I bought almost the cheapest kind of vodka. (The only reason I didn’t get the cheapest is because I decided to spend the extra couple of bucks to get a glass bottle. Plus it is Alberta-made so I can support local two-fold.) They also do regular wine tasting evenings, bulk orders for weddings or other catered events and can order in special requests! I should also mention that Chateau Wine and Spirits is owned and operated by my sister-in-law and her husband.
So here are my directions:
1. Use about 6-8 beans per cup of vodka. Some recipes called for whole beans, some for split beans, and some for chopped. The most in depth recipe I read called for splitting the beans, scraping out the seeds and then chopping the pods. I figured I’d go halfway and split the bean and then chopp into about half to 3/4 inch lengths. Tip I found while reading comments of the aforementioned recipe: use scissors. It only took me a few minutes to cut my little bundle of beans.
2. Put them in the vodka. (Kids can be a great help if you have a lot of pieces and a very small bottle opening to put them into) Be careful not to overflow your bottle. I poured a bit out of the bottle and put into a glass jar so I have two containers of extract in my cupboard. If you bought a plastic bottle of vodka then use a glass jar or bottle to make it in because you don’t want plastic yuckies leaching into your vanilla over the next months.
3. Shake it up and let it sit. Shake it up every day or so for a week. Then just give it a shake whenever you remember it. Another tip: label your jar/bottle. I used a black Sharpie to write the date on it so it is easy to see how old it is.

Homemade vanilla extract with seeds floating around
You can use it as early as 2-3 weeks but it is best if you let it sit for about 6 (or more) months. I know that I can’t wait that long though so I’m going to try it in a few weeks. In the meantime, I’m going to use up the vanilla that my sister brought back from her Mexico vacation. And then I’ll use my Costco stuff up. And then, finally, I’ll be able to dive into my homemade vanilla extract! Coffee creamer, cake, muffins… I can smell them already! Actually, I can still smell the vanilla on my hands. Have I mentioned how much I love vanilla?
Make sure you don’t miss any posts by subscribing to my weekly blog newsletter!
[mc4wp-form]
by Tessa | Homemaking

My mint plant started to look like it was feeling a bit crowded so I trimmed a few sprigs off the top with a plan to dry it and put it into one of my new (to me) glass canning jars. I was already picturing it in my pantry as I gently washed and dried my mint. Caleb had different ideas.
“Mom, we need to bake something with these.”
“Like what? I don’t think that the chicken thawing for supper will taste good with mint.”
“No, we should bake cookies. It has been a while since we baked cookies and mint cookies would be so yummy.”
So I went off to my trusty laptop to find a recipe for mint cookies. Chocolate and mint just go hand in hand so we found a great recipe for mint chocolate chip cookies. There were a ton for mint extract but that was the only one I found to use with fresh mint.
We started mixing the ingredients and I soon realized that I didn’t have an egg. So I called the neighbour (aka my mom) to ask if she had one (she pretty much always does!). I sent Caleb over and he walked back very carefully cradling our missing ingredient.
Mint chopped, dough mixed, beater licked and we waited. My kitchen started to smell better and better!

Mint Chocolate Chip Cookies
Fresh out of the oven and garden!
The cookies have now passed the official taste test and it’s all I can do not to eat them all right now. I’ve already had two of them. Or maybe it was three?
I made a few subsititions to the recipe because I try to make cookies a little more healthy for my family: I used about 2/3 of the sugar (looking back I should have also substituted the my organic raw sugar for the white refined stuff); I used organic whole wheat pastry flour; I only put in half the chocolate and part of that was raw cacao nibs. So now I feel a little bit better about the fact that I’ve eaten a few extra cookies.
Things Caleb learned: measuring/counting ingredients, we talked about why we chop the mint (more surface area to infuse the mint flavour), and we counted the total number of cookies made (2 dozen, though it would have been one more except I ate the extra dough!). He also learned about how to harvest mint and the purpose of pruning. We talked about how we are going to dry it to save it for another day. Lastly, we ate some of the fruits of our labour.
Make sure you don’t miss any posts by subscribing to my weekly blog newsletter!
[mc4wp-form]
by Tessa | Homemaking
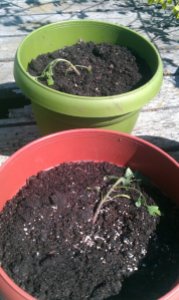
I didn’t post about my first attempt because it didn’t last long enough to be significant. I bought 6 tomato starters, transplanted them, and then thought that 15 degrees at 11:00pm meant that it would not freeze that night. I was wrong.

Poor Tomatoes
I did things a little bit differently the second time around and I’m hoping and praying for better results. I actually said a prayer over my tomatoes.
Since I killed my first 6 tomato plants in less than 24 hours of purchasing them, I have learned a lot about tomatoes. Some sites I read say that they are easy to grow. Most say they are not. They can either be “hugely satisfying or a flat out disaster.” Here are some of the tips that I learned:
I also got a couple of (free) ebooks off Amazon. I don’t have a Kindle but I put the Kindle app on my phone and computer. I have two ebooks specifically about container tomatoes and several more about gardening and container gardening in general. With all the reading I have done, I’m hoping for a bumper crop of tomatoes in the fall.

Tomato Babies

Uh oh!
So yesterday I transplanted my tomatoes, with eggshells at the bottom of the hole, and put them in a sunny spot on my deck. I made sure to bury them up to the top leaves and watered them well. I was feeling pretty good about myself and held high hopes for the future of my baby tomatoes. Until the wind started. We had just over an hour of extremely fierce wind mixed with a touch of rain. So I dragged all of my containers in the house. Just as I put the last one inside and shut the front door, my tomato babies were viciously attacked by a baby bear! My littlest munchkin thought it was great fun to have dirt in the house and decided that containers with soil are just as much fun as the sandbox. Then he got upset when I reprimanded him and took it out on my plants. Half a leaf was torn off. That plant had an extra prayer said over it. Worst case scenario, it dies. I have a few back ups just in case.
Today is looking sunny already, albeit a little bit windy. My littlest allowed me to sneak away this morning and slept just long enough for me to move my containers back outside and water them well. He will realize they are out of his reach and my little spitfire will certainly let me know his feelings on the matter but, for now, both the tomatoes and my little guy are content. Now to see if I can keep them alive. The tomatoes I mean. I’m pretty good at keeping my kids alive for longer than a day! Please tell me that I’m not the only one who has had such terrible luck with tomatoes. And if you have good luck, what’s your trick?
The irony of it all: I don’t even like tomatoes. I only want them to make homemade spaghetti sauce.

by Tessa | Homemaking

I have been making yogurt (on and off) since September 2011. I have read a whole bunch of recipes and, through much trial and error, found a recipe that works for my family. Some things that I have learned about how to make yogurt are as follows:
1. The longer you let the yogurt ferment, the more tart it becomes. My family does not like tart yogurt so about 4-5 hours results in a milder taste.
2. If the milk boils over you can clean up the mess while it cools down and the remaining milk will still work for yogurt.
3. A thermometer is handy to have but not essential.
4. White/clear vanilla tastes much better than the dark stuff.
I will tell you my method but you may need to tweak it a bit for your family’s taste preference.
Materials required:
- Container(s) for finished yogurt with a secure lid (glass or plastic works)
- Enough milk to fill your container(s)
- Pot with a lid that will fit the milk
- Thermometer (handy but optional)
- Yogurt starter or some store-bought yogurt with live, active bacterial cultures (doesn’t really matter which brand, I have had success with several kinds, it is handy if it is plain or vanilla because otherwise you end up with a couple chunks of fruit in your yogurt)
- For greek yogurt: fabric to strain through (I have used cotton flat diapers and flannel receiving blankets), colander, and a pot that fits the colander if you want to save the whey
Steps:
- Put milk into pot.
- Heat the milk until almost boiling (about 180F). It will reach this temperature much faster if you use a lid.
- Simmer at this temperature for about 1-2 hours (with a lid so it doesn’t lose heat)
- Remove from heat. At this point you can put it into a sink full of cold water to speed cooling or just let it sit on your counter to cool. It is ready when it is about the same temp as a warm (not hot) bath (about 110F). If it is too hot your starter bacteria will die. (I tried to think of another way to word that but “get killed” sounded just as drastic)
- Have about a tablespoon of starter yogurt per liter of milk. Put them in a separate small bowl and add a few tablespoons of milk. Mix well. It is easier to mix into a large milk amount when it is diluted a bit with the milk already.
- Pour milk-diluted starter into your milk and mix well. At this point you can also add some vanilla or other extract. (Some recipes say you can add sugar/sweetener at this point but I have never had luck with that.)
- Pour into your yogurt container(s).
- Wrap in a blanket and/or put in a warm place where it will not get disturbed while it ferments. I usually turn my oven on for a bit (until it reaches about 100F) and then turn it off, wrap my yogurt in a blanket and put it in the oven. I have also put it in the bathtub wrapped in a blanket but that piqued my sons’ curiosity a little too much. In the oven it is out of their sight.
- Let it sit, undisturbed, for about 4-5 hours.
- Put it in the fridge overnight and by morning you will have yogurt!
Greek yogurt:
- The next morning pour/dump your yogurt into the colander lined with the fabric
- Put it in the fridge and let the whey drip out. I usually leave it for about 3 hours for 7 cups of yogurt.
- Put it back in the container (or in a different one if you prefer).
Note: For 7 cups of yogurt I end up with about 2 -3 cups of Greek yogurt. And you can use the whey for numerous things, though I still haven’t figured out what to use mine for.
So there you have it. Here is the short version: Heat milk, cool milk, add starter, let it sit in warmth, overnight it in the fridge and enjoy!
I usually start my yogurt at about 2pm (while my littlest is napping) and heat till around 4. Then it ferments until about 9 and I stick it in the fridge overnight. I set my oven timer and have even put reminders on my phone because otherwise I forget about it.
Have you ever made yogurt? I’d love to hear your yogurt making stories!
Do you have any other tips/tricks to share?