by Tessa | Motherhood
It isn’t hard to make play dough. It uses very few ingredients and takes only about 10 minutes from start to finish and provides countless hours of fun for my kids. So why do I make such a big deal over it?
I asked myself these questions last week as I watched my boys try to stick together play dough that was half dried out and kept falling apart.
My list of excuses:
I’m so tired today.
I’ll make some later today.
l doubt I have the right ingredients.
They will want to help and I’ll have a big mess to clean up.
They are still enjoying the crumbly stuff.
The truth:
I’m tired everyday.
I most likely wouldn’t get around to it later.
I probably do have ingredients and the least I could do is check.
So? There is going to be mess made today anyway If not in the kitchen, then in other areas of the house.
It would make them so happy to have new playdough that is easier for them to build things with.
As I had that inner dialogue and shot down each of my own excuses, I prayed. I asked God for the energy and oomph to to get out of the rocking chair, lay down my sleeping baby (and be okay with the fact that he would likely wake up sooner than if I was holding him) and go to my kitchen. I don’t always listen to God’s prompting but then I was reminded by a still, small Voice that, last month, I made a commitment to pursue the hearts of my children.
So I did it.
I’m sure there was just as much cheering in Heaven as there was in my house when the boys discovered what I was doing. Cheering for their happiness as well as cheering for my small triumph. God even blessed me with Baby Bear sleeping in his seat for awhile so I resisted the temptation to check a few things off of my to do list so I could play with my bigger boys. After I had rocked Baby Bear back to sleep, I had the entertainment of 2 little boys and their creative imaginations:
There were 10 invisible puppies involved who lived in the wall and got a ride to town for ice cream in Bumblebee and Heatwave
 (affiliate link to a couple of my kids’ favorite gifts from this past Christmas). Biscuit even asked the puppies to help him put the playdough away at tidy time. He held the bag open for them to put the playdough in. It was great in theory but then the puppies jumped in the bag instead. They only came out to jump on Papa Bear’s head and eat ice cream. The puppies have visited every day since then and continue to be a great source of imaginative play, even without the playdough.
Another benefit of making playdough that day is the renewed motivation it gave me to spend purposeful time with my children, in their world. They have asked me more often these last days to play with them. And I’ve been saying “yes” more often (though I did have to draw the line at digging in the giant snow pile because it just doesn’t seem safe to do that with Baby Bear in the sling).
I’m pursuing the hearts of my children by having a daily focus time, joining them in whatever they are playing. And you know what? I’m relearning how to play and it’s kind of fun!
What kind of play have you joined your children in lately?

by Tessa | Homemaking
I have a crab apple tree. It is nestled comfortable between my maple trees. For four summers I have watch those tart little apples drop to the ground and sit there, undisturbed, while they compost throughout the winter. I planned to let the same thing happen again this year because I didn’t think they had any purpose other than to feed the birds. Then I had this wonderfully terrible thought: why don’t I “Google” it?
Crab apples make very good crab apple butter. I was recently given a jar of apple butter by a friend and it tasted like apple pie on toast. I LOVE apple pie! (If you are local and want to give me one I won’t turn you down!)
Here is the story of my quest for apple butter:
1. Go to Google to find a recipe.
2. Google how to get the apples off the tree and discover that I’m supposed to shake them off. They make it sound so easy. It is, in fact, quite a workout. Put on a long sleeved shirt (the branches scratch something fierce!) or hire someone with strong, energetic arms (I told my husband that it would be a great family bonding activity). Plus get a couple of adorable little boogs with buckets to pick them up. Dump trucks work too. 
3. The recipe told me to cut off blossoms and stems: You could probably just take a shortcut and leave the blossoms. You’re going to strain them out anyway. And give yourself some time! Estimated time: 3.5 hours.

4. Cover with water and cook till really mushy: Make sure that the correct burner is on so you don’t accidentally burn your nice bamboo mixer. Estimated cooking time: (not including the burner mistake) 2 hours.
5. Strain: Wow There has got to be an easier way! The recipe called for a “coarse” sieve so, naturally, I grabbed my fine metal one. Decided it was taking too long so I upped the ante: my blue coarse pasta strainer. That one was not sturdy enough for me to mash through. Grabbed my big metal colander. Worked decently but took forever! The holes were in the wrong spot. So I downgraded again to my blue one. Nope, still not sturdy enough. Back to the fine mesh metal one. I should have just stuck with this one because it ended up being the simplest to use. Grabbed my spatula and started mashing. Then went to bed, woke up, did chores, and mashed some more.
Estimated time to strain all the apples: 4 hours

6. Spice, sugar and cook: I figured it was all downhill from here. All I had to do was add some spices and cook it, right? Well, I have a few tips:
- It splatters. A lot. I managed to get burned. Several times. (Then I got smart and started using an oven mitt while mixing it). I’m so glad that my aloe vera plant managed to recover from it’s near death experience after I first bought it. It’s coming in really handy.
- Also, the recipe told me it would need to simmer for 2 hours. That’s a little off. Mine simmered for a total of 24 hours. Note to self (and anyone else who makes it this far in their quest for apple butter): If it still looks like apple sauce, don’t try to can it! I was super excited after two hours to get out my jars and have my first try at canning. I had my pots all ready, tools within reach, filled my jars, and then had a thought: What is the difference between apple butter and apple sauce? So I Googled it. The difference is very small: To make apple butter you add spices and simmer longer. Much, much longer. I poured my apple sauce back into my pot.
- You get a much better texture if you blend it. I used my stick mixer but you can use whatever you have on hand.

7. Canning: The simplest way that I could find to tell if the apple sauce has turned into apple butter is to put a teaspoon on the counter and wait for 5 minutes. If there is no water pooling around it then it’s ready to can. Since I had never even seen someone else can anything I needed to give myself a quick tutorial. So, of course, I went to my trusty friend, Google. I was lucky enough to find out that somewhere along the way I managed to acquire some tools for canning (jar lifting tongs and a metal rack for the bottom of my pot). I still have no idea where they came from but I’m glad that I kept them!

8. Enjoy: I used 2 cup jars and have 7.5 of them. I’m not ready to look at them yet. Maybe when my burns heal and the rest of the crab apples fall of the tree I will be ready to move to this stage. I thought I might give the jars as gifts but, as much as I don’t even want to look at them right now, I’m going to be selfish. I worked hard for that butter and one day I’m going to enjoy it!
Make sure you don’t miss any posts by subscribing to my weekly blog newsletter!
by Tessa | Homemaking

It has occured to me how complicated we can make our effort to living simply. We feel that we need to do it all and then some. We read blogs and books and feel like if we aren’t growing everything we eat and making everything we use, we must be doing something wrong. This revelation came to me when I was reading an article on how to simplify your DIY.
Or maybe I’m just talking about myself here. I know that I have a tendency to over complicate things. I have a wonderfully annoying habit of researching the pants off of anything and then trying to dive in head first. I really should remember what my goals are for changing our lifestyle.
I have a number of reasons: frugality, health, appreciating the simple things, teach my kids the importance of work and more. But, when I dream about my goals for my life, I don’t picture money in the bank, or being superfit/healthy. I picture being able to take the time to enjoy my family. Working alongside them without being tied down by the craziness of this world. Slowing down. Peace.
Now I need to ask myself, will what I’m doing lead me to that life? I’m pretty sure that, if I attempted to learn and do everything at once (garden, canning, herbalism, soap making, cheese making, weaving, knitting, sewing, building and wood working and the list goes on) that I would just burn out. We are not designed to do it all. And very few people are able to dive in head first without drowning. That doesn’t sound very peaceful to me.
So, instead of my grand plan for our garden this year, I managed to move one step further than last year. The only vegetables I planted were tomatoes and carrots. Oh, and onions because I saw an idea on pinterest and thought it would be a simple way to use up the space where I planted my chamomile (that didn’t come up). I planted in containers because I figured it made sense to have a portable garden due to our impending move. I watered with a bucket from my kitchen sink because I have no faucet on my house. And I watched and waited. I did very minimal weeding (one of my favorite parts of container gardening) and only a little bit of fertilizing.

My garden took about 10 minutes to care for every couple of days and I didn’t lose my mind. I learned a lot about growing tomatoes and carrots. I didn’t get a huge and bountiful crop this year but I did manage to learn enough to point me in the right direction for next year’s garden.
Next year my goal is small: plant enough of a garden so I don’t need to buy veggies through the growing season. If that goes well, the year after next I’ll plant enough so that we can store some for the winter.
But, for now, 10 minutes extra into my schedule is simple. Because simplifying should be simple to do.Another couple great posts that I have recently read that are great grounders when you’re feeling overwhelmed or like you’re not doing enough:
How Do you Know When You Are Natural Enough? (Cheeky Bums Blog)
dear sweet mom who feels like she is failing (Finding Joy)
Make sure you don’t miss any posts by subscribing to my weekly blog newsletter!
[mc4wp-form]
by Tessa | Homemaking
I am not a conspiracy theorist. I do not believe our government is purposely trying to poison us or that our schools are trying to brainwash our children or that our doctors are purposely trying to make us sick (though I do believe some decisions they make have that side effect but that’s a whole different story!). I do wonder about dentists sometimes though.
While I was growing up I was meticulous about my teeth. I brushed at least twice a day and flossed a few times a week. I thought all my hard work was paying off when my siblings and I went to the dentist and only my sister had cavities. I figured it was because she ate too many candies. Because candies cause cavities, right? My brother didn’t have any in spite of the fact that he was not as meticulous about his dental hygiene as I was. I figured he just got lucky (he figured it was because he chewed a lot of gum).
A few years later, with no change in my dental routine, I came home from the dentist with about 3-4 new fillings. So much for my perfect dental routine! I have since learned that cavities are caused by bacteria, not sugar. Bad bacteria plants itself on your teeth and feeds off sugar to multiply so leaving sugar (natural or artificial) on your teeth certainly isn’t a good thing, but sugar in itself doesn’t cause cavities. With my dental routine I had been fighting the sugar, not the bacteria.
Interesting fact: we are not born with this bacteria. It is given to us through someone else’s spit, usually before our second birthday. Usually by our mother. Not on purpose but through loving actions such as sharing utensils or food or spit cleaning a pacifier. (I can’t remember where I read that but I believe it was in one of Dr. Sear’s books)
So, back to the dentists. I have a theory:
- Toothpaste is supposed to help prevent cavities.
- Dentists promote certain brands of toothpaste.
- Dentists make more money when people have cavities than when their teeth are healthy.
- It would make no logical sense for a dentist to promote something that would put him/her out of business.
- Therefore those toothpastes probably don’t do what the advertisements and packaging claims. In fact, they may be part of the problem.
Is it a conspiracy? Maybe not. But it certainly seems like a conflict of interests.
I have eliminated chemicals in a lot of areas of my life so it would make sense that the toothpaste had to go. I haven’t brushed with toothpaste in almost a year. My cavities haven’t magically healed themselves (darn!) but they haven’t gotten any worse either. The good news: my teeth feel great! They seem to stay clean longer and my breath is still fresh. I also don’t have to coax my son to spit out his yummy bubblegum or fruit burst flavoured toothpaste because it is too dangerous to swallow.

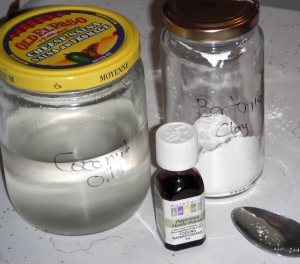
Here’s what I use:
- Coconut Oil: antifungal, antibacterial, and helps stop tooth decay
- Peppermint Essential Oil: antiseptic and minty fresh
- Bentonite Clay
 (a recent addition and not neccesary): mild abrasive, detoxing agent, and has been said to help remineralize teeth
I have found many different recipes online but a lot of them are way to complicated for me. I know people use plain baking soda but, to be perfectly honest, it tastes really gross. It’s also quite abrasive and it is not usually recommended for daily use so I certainly don’t want to use it for my little men.
So I have just been using coconut oil with peppermint essential oil. Simple. I like simple. If this is all you have then it will work perfectly fine. Just mix together and dip your toothbrush in to brush. The hardest part is realizing that it is still cleaning, even if it’s not foaming. I also found that I didn’t have to rinse after brushing (helpful when you have little people that want to splash as soon as you turn on the tap!) so you can brush without water.
My recent addition of the Bentonite Clay is because I’m going to try my hand at remineralizing my teeth. I’m taking cell salts (Calc Fluor and Calc Phos
 ), in addition to brushing with clay and coconut oil, and I’m hoping it helps. I brushed with it for the first time today and I can’t even explain how good my teeth feel right now. More than just clean. They feel soft actually. The toothpaste felt strange while brushing but I think it is just a new texture to get used too.
So there is a very simple toothpaste recipe that is safe and gentle enough for a child! C will be very happy to brush his teeth tonight because he was looking forward to being done our baking soda mix too.

Linked up at: Frugally Sustainable
Edit: People have been asking me about the quantities of each: I use about two parts oil to 1 part clay. Then essential oil to taste (my jar took about 10 drops). But you can experiment and mix it until it is a consistency that you like.
Also, for the first photo my house was too hot for my coconut oil to be solid. By the time I had mixed it up and moved it to my bathroom the cool night air solidified it again. But because the clay was mixed it I still find that, even at solid state, it is the perfect consistency to use.
Hope that clears some things up!
Make sure you don’t miss any posts by subscribing to my weekly blog newsletter!
[mc4wp-form]
by Tessa | Homemaking

I would venture to say that the majority of people who know me know about my love-affair wtih vanilla. Whether it is in food, or body care products, or candles, I just can’t help myself. It is delicious and beautiful all at the same time! I used to wear vanilla perfume every day and apparently it was seen as “my” scent. Other people would wear it and people who knew me would tell them they smelled like me. My sister’s friend even found a bottle of vanilla perfume while they were in the drugstore and told me sister, “it’s Tessa in a bottle!” So it would make sense that, after seeing all the wonderful vanilla recipes floating around on Pinterest, that I felt compelled to try one.
So today my biggest boy and I made some vanilla extract.

Helping Hands
The ingredients were very simple:
- Vanilla beans (I purchased mind from Real Raw Food in BC, Alberta). I have had the beans for a few months and have been waiting for jsut the right recipe to use them in. They are very precious to me so I didn’t want to waste any.
- Vodka (recipes called for 35%-40% alcohol, I got 40%). I had the pleasure of supporting a local business for this purchase. Chateau Wine and Spirits in Lacombe, Alberta, is a fabulous place to deal with. They offer everything from cheap to specialty beers and wines and vodka and every other kind of alcoholic beverage that tickels your fancy. As I never (read: only once in my entire life other than this time) purchase alcohol, the customer service was great to a newbie like myself. I bought almost the cheapest kind of vodka. (The only reason I didn’t get the cheapest is because I decided to spend the extra couple of bucks to get a glass bottle. Plus it is Alberta-made so I can support local two-fold.) They also do regular wine tasting evenings, bulk orders for weddings or other catered events and can order in special requests! I should also mention that Chateau Wine and Spirits is owned and operated by my sister-in-law and her husband.
So here are my directions:
1. Use about 6-8 beans per cup of vodka. Some recipes called for whole beans, some for split beans, and some for chopped. The most in depth recipe I read called for splitting the beans, scraping out the seeds and then chopping the pods. I figured I’d go halfway and split the bean and then chopp into about half to 3/4 inch lengths. Tip I found while reading comments of the aforementioned recipe: use scissors. It only took me a few minutes to cut my little bundle of beans.
2. Put them in the vodka. (Kids can be a great help if you have a lot of pieces and a very small bottle opening to put them into) Be careful not to overflow your bottle. I poured a bit out of the bottle and put into a glass jar so I have two containers of extract in my cupboard. If you bought a plastic bottle of vodka then use a glass jar or bottle to make it in because you don’t want plastic yuckies leaching into your vanilla over the next months.
3. Shake it up and let it sit. Shake it up every day or so for a week. Then just give it a shake whenever you remember it. Another tip: label your jar/bottle. I used a black Sharpie to write the date on it so it is easy to see how old it is.

Homemade vanilla extract with seeds floating around
You can use it as early as 2-3 weeks but it is best if you let it sit for about 6 (or more) months. I know that I can’t wait that long though so I’m going to try it in a few weeks. In the meantime, I’m going to use up the vanilla that my sister brought back from her Mexico vacation. And then I’ll use my Costco stuff up. And then, finally, I’ll be able to dive into my homemade vanilla extract! Coffee creamer, cake, muffins… I can smell them already! Actually, I can still smell the vanilla on my hands. Have I mentioned how much I love vanilla?
Make sure you don’t miss any posts by subscribing to my weekly blog newsletter!
[mc4wp-form]